
Lab note · Nov 3, 2026
Modifiers: make one spot of a print strong without making all of it heavy
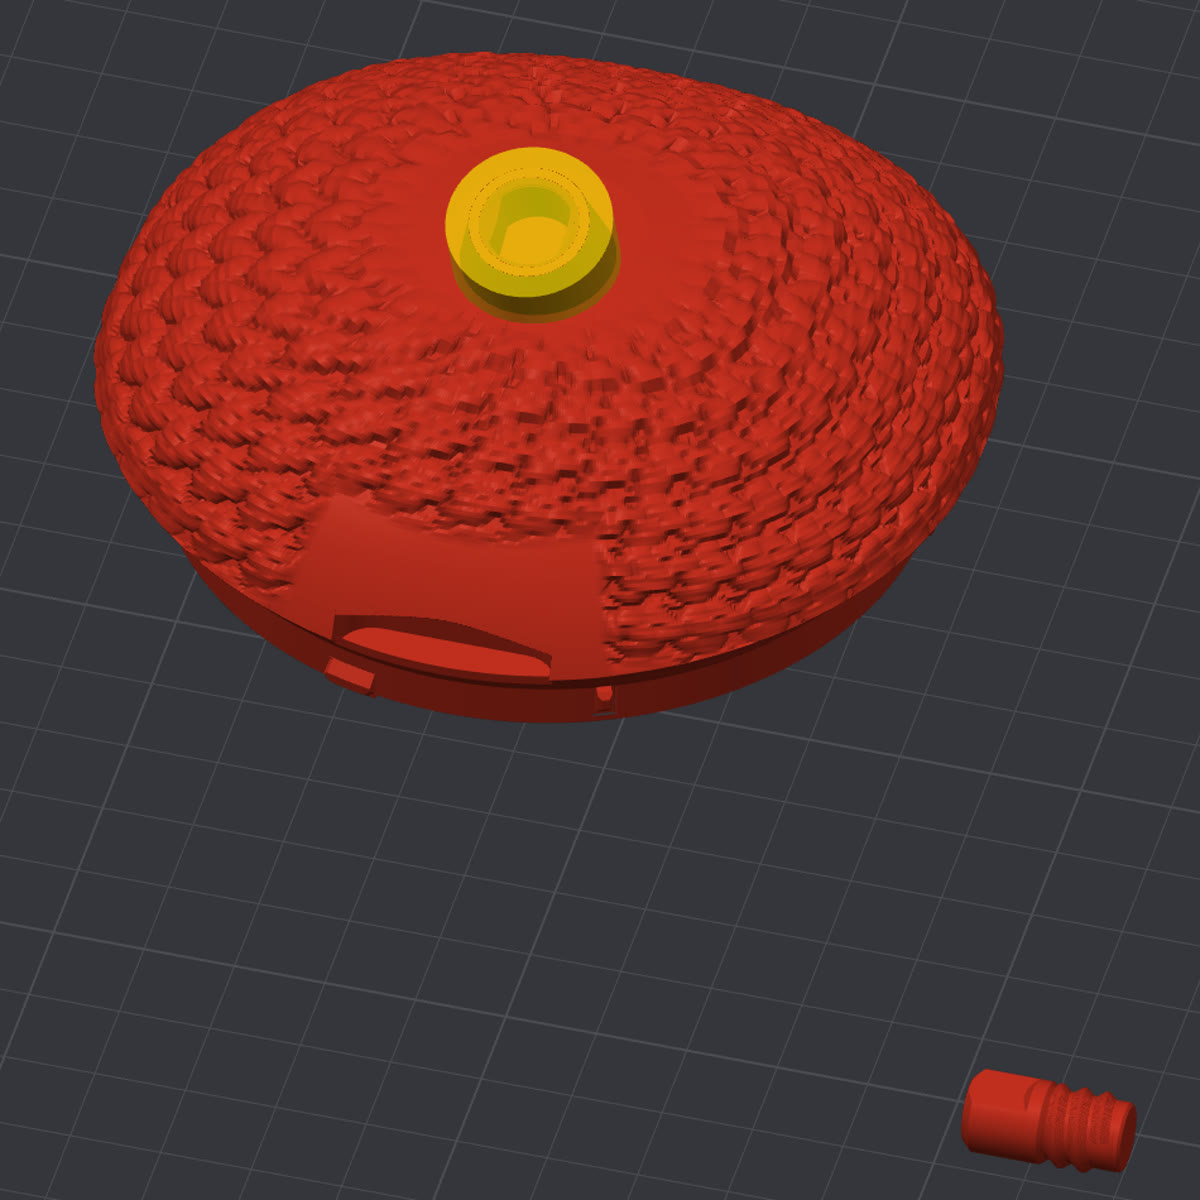
A yellow block appeared on our lid in the slicer. It is a modifier: an invisible shape that prints the plastic inside it with different settings. Here is when to use one.
I hold things together from the inside. A modifier tells me exactly where to be solid.
- Lid infill15%: mostly air inside
- Inside the modifier100%: solid plastic
- WhereAround the pin socket
In short
- A modifier is an invisible shape in the slicer: the plastic inside it prints with different settings.
- Use it to make one small spot solid (a screw hole, a socket, a thin neck) while the rest of the print stays light.
- In one study, that kind of local strength gave the same strength with about a sixth less plastic.
The question
Most of a print can be light, but a few small places carry the load: a screw hole, a peg, a hinge, a thin neck. How do you make only those places strong?
What a modifier is
A modifier is a shape you add to a part in the slicer. It is never printed itself. Instead it says: “inside here, print with these settings.”
Settings stack from big to small: the whole plate, then the object, then a part, then a modifier. The smallest level wins inside its own space (Bambu Lab’s modifier guide (opens in a new tab)).
Why not just turn the infill up?
Infill is the pattern inside a print. 15% means mostly air with a light lattice; 100% means solid plastic.
Strength comes mostly from walls, and from density where the stress is. In one tension test on ABS (opens in a new tab), the infill pattern changed strength by less than 5%; density decided it.
Density only where it is needed beats density everywhere. In a study on L-shaped brackets (opens in a new tab), a part at 15% with 30% in its stressed corner was about 20% stronger per gram than the same part at 30% everywhere. Going to 70% in that corner added weight, not strength.
Very dense parts also print slower, use more filament, and can warp. For strong parts, Bambu Lab suggests (opens in a new tab) about 5 walls and 25% infill rather than going over 50% everywhere.
| Infill | What it means |
|---|---|
| 30% everywhere | Strong, but plastic spent where nothing pulls |
| 15%, with 30% in the stressed corner | About 20% stronger per gram: the same strength with about a sixth less plastic |
| 70% in the corner | Heavier, not stronger |
The kinds Bambu Studio gives you
There are four, all in the right-click menu of a part. The modifier guide (opens in a new tab) has pictures of each.
| Tool | How to add it | What it is for |
|---|---|---|
| Modifier mesh | Right-click the object › Add Modifier (box, cylinder, or load any STL) | Different settings inside a shape: solid plastic in a socket, more walls around a screw hole |
| Height range modifier | Right-click › Height range Modifier, then set from and to | Different settings for a slice of height: slow down the top of a tall, thin part |
| Negative part | Right-click › Add Negative Part | Cuts a shape out when slicing: a pocket or an engraving without editing the model |
| Text as a modifier | Text tool › Operation: Modifier | Flush colored lettering instead of raised text |
Our example: the key socket in a lid
Our character box lid has a small flat-sided socket on top that a pin pushes into. The pin must never turn, so the plastic around the socket must not crush or crack.
The lid prints at 15% infill, because it is big and mostly shell. A modifier around the socket prints that one spot at 100%: solid plastic for the key to grip.
The slicer shows the modifier as the yellow block. It prints in the lid’s own color.
What a modifier can’t do
It won’t save a small thread printed standing up. Its layers stack across it like a pile of coins, and a sideways push splits the pile. We learned that with a snapped stud.
Print threads lying down, keep them big, or use a metal insert.
And look at every part in the slicer before printing. The pin beside this lid once came out of our build as two pieces, and only the slicer showed it.
Our rules of thumb
Starting points we use, not laws. Adjust after a test print.
| Where | Modifier | In plain words |
|---|---|---|
| Screw holes and inserts | A cylinder about 3 times the hole, with 6+ walls or 100% infill | The screw bites solid plastic |
| Hooks, tongues, anything that bends | A box over the bend at 40–50% with 2 extra walls; body at 10–15% | Strong where it flexes, light elsewhere |
| Handles and thin necks | 100% infill in the neck | No hollow spot to snap |
| Big flat signs | A height-range modifier to keep the bulk at 10–15% | Light and quick, no warping |
Try it
Load a part with a hole in it. Right-click it › Add Modifier › Cylinder. Size the cylinder to about 3 times the hole and center it on the hole.
Select the modifier in the object list and set Sparse infill density to 100% (or Wall loops to 6).
Slice, open Preview, and scrub through the layers: the solid ring around the hole should be easy to see.
What we do now
- Keep the body light (10–15%, mostly air) and put a modifier where the load is.
- Don’t go above about 70% locally: it adds weight, not strength.
- A modifier is no fix for a thread printed standing up: print it lying down.
- Look at every part in the slicer before printing, and check that it is one piece.